Online Trade Show
Guide For Schools

Throughout the school year, VE will be hosting regional Online Trade Shows where firms connect with one other and with industry professionals to buy and sell their products and services through video conference sales sessions.

This site has been developed as a guide to participation in online trade shows, where rising talent from middle and high schools around the country develop professional skills and business acumen by running a VE company.

Before the Trade Show

Local/Regional Trade Shows

South

  • Southern Region Online Trade Show | 12/05/24 | 8:30 AM – 3:00 PM

Midwest

  • Midwest Online Trade Show Demo Day | Nov 13, 2024
  • Midwest Fall Online Trade Show | November 14, 2024
  • Midwest Winter Online Trade Show | January 31, 2025
  • Midwest Spring Online Trade Show | March 21, 2025

NY State & New England

  • NY State Region Online Trade Show | 11/12/2024 | 7:30 AM – 2:30 PM

Mid-Atlantic

NYC & Mid-Atlantic Online Trade Show | November 25, 2024

West

West Fall Online Trade Show | November 13, 2024

VE-JV

VE-JV Online Trade Show | February 11, 2025

Registering for an Online Trade Show

Regional Directors will inform schools via email when Online Trade Show registration is live, and include any other relevant information. Below are video tutorials with step-by-step instructions for registering after receiving that notification.

Step-by-Step Registration

  1. Registration can be found in the Hub / Event Registration / Online Trade Show. Teachers and select students* are able to register their firm for Online Trade Shows using the following pathway: Hub / Event Registration / Online Trade Show
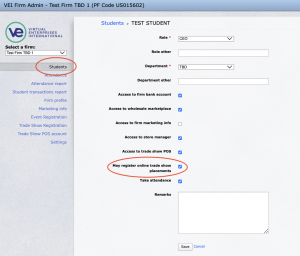
    *Teachers can grant access to specific students allowing them to register for an Online Trade Show by updating student permissions in the Hub / Marketplace Tools / Firm Admin / Students section.
    [space]
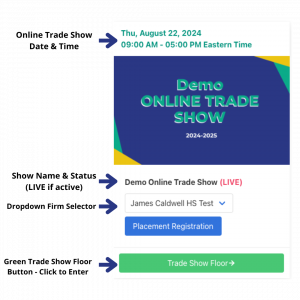
  2. Clicking on Online Trade Show tab takes you to the Online Trade Show landing page, where you will see Current and future Online Trade Shows open to your region, as well as previous Online Trade Shows from the 2024-25 year.
  3. To register your firm, locate the desired Online Trade Show and select your firm name from the dropdown firm selector.
    [space]
  4. Click the blue Placement Registration button to go to the Placement Registration intake form, and complete the following information:

• Trade Show Floor Placement – select either standard placement or top placement (if available). Virtual booth rates apply and may vary by show and will be paid from the firm bank account. If applicable, top placement (at a premium cost) will position the firm’s trade show sales lobby icon at the top of the trade show floor.

• Company Description – provide a short description of your firm

• Website Link – provide a link to your firm website, ensuring the URL starts with https://

• Sales Period(s) – enter the following information for up to three (3) sales periods:

– Time period (from and to) that firm will be accepting customers.
Note: Depending on your browser, you may have to enter your time period in military/24-hour format
– Time Zone
– Video conference link (MS Teams, Zoom, Google Meet, Jitsi, etc.). The URL must start with https://

• Company Logo – upload your firm’s logo using one of the following image file types: PNG, JPEG or GIF. Maximum image width is 200 px, and maximum height is 90 px.

• Sales Brochure (optional) – upload a firm sales brochure with a maximum file size of 5 MB

Booth Fees

There may be a virtual booth fee for firm placement on a Trade Show Floor. This will be set by your Regional Team for local and regional trade shows. This fee will be paid by the firm as part of registration.

How to Prepare for the Online Trade Show

On the day of the event, your firm name will be accessible from the Online Trade Show Floor and will appear as “LIVE” during the time slots you indicated in the firm registration. The Online Trade Show will include two types of participants – shoppers or sellers.

SHOPPERS include interested partners, judges, or guests who have been given login information, a credit card, and shopping checkout instructions. They will enter the Online Trade Show Floor, view the list of participating firms and may choose to view firm websites and/or optional sales materials. By selecting a live firm, the shopper will be joined into a video conference “Sales Lobby” with team members of the firm. Students can also be shoppers (using student debit cards) during the times they are not selling to customers.

SELLERS are registered firms that have provided Sales Lobby link(s) for designated time slots to appear on the Online Trade Show Floor. Prior to the event date, plan how your firm will handle sales during the video conference. Some examples include: sharing a sales pitch, providing product descriptions, sharing sales materials and/or website link, and walking a customer through making a purchase by sharing your screen or using the chat feature. On the day of the event, sellers should log into their video conference link 5-10 minutes early to prepare to receive shoppers. Use the recommendations and conversation tips below as a guide to prepare for the online trade show as a seller.

Online Trade Show Key Terms

What is an Online Trade Show?
Online Trade Shows provide VE students a platform to promote their business, make sales, meet customers, and connect with other VE firms around the country. The Online Trade Show floor is a web page that showcases each participating firm and a video-conferencing link that functions as their sales booth. Guests are provided with a VE credit card in order to make purchases from the firms and can visit the trade show floor anytime during the Online Trade Show hours. All participants are encouraged to keep their video cameras on and keep conversations professional.

What is a “Video Conference Link”?
It is a link to a video conference call (such as Google Meet or Zoom) that firms will use to trade with other firms or sell to visitors. Learn how to set one up in the Setting Up Your “Sales Lobby” section of this page.

What is the “Online Trade Show Floor”?
This will include the list of all participating firms, their logo, website, sales materials, and the “Sales Lobby” link(s) for participants to join the video conference.

What is a “Sales Lobby”?
A “Sales Lobby” is the video conference link that firms will create using the preferred video conferencing tool. Visitors will enter into your “Sales Lobby” from the “Online Trade Show Floor” page to engage in conversation with your firm.

What is a “Breakout Room”?
This is the smaller video conference with the sales representative and customer. Breakout Rooms are optional. The “Breakout Room” will allow firms to conduct several trading sessions at once.

What are Sales Materials?
Sales materials refer to any catalogues, brochures, flyers, etc. that gives the shopper an idea of what your firm sells and what the price is. Submitting sales materials is optional. Reference the Sales Material Rubric on the VE Hub → Curriculum → Competition Scoring Guides & Resources → Local/Regional Competitions (Presentation-Based) → Sales Material

*Note that the side navigation bar is being updated and materials can be found in the For Teachers and the For Students sections in the interim.

Online Trade Show Checklist

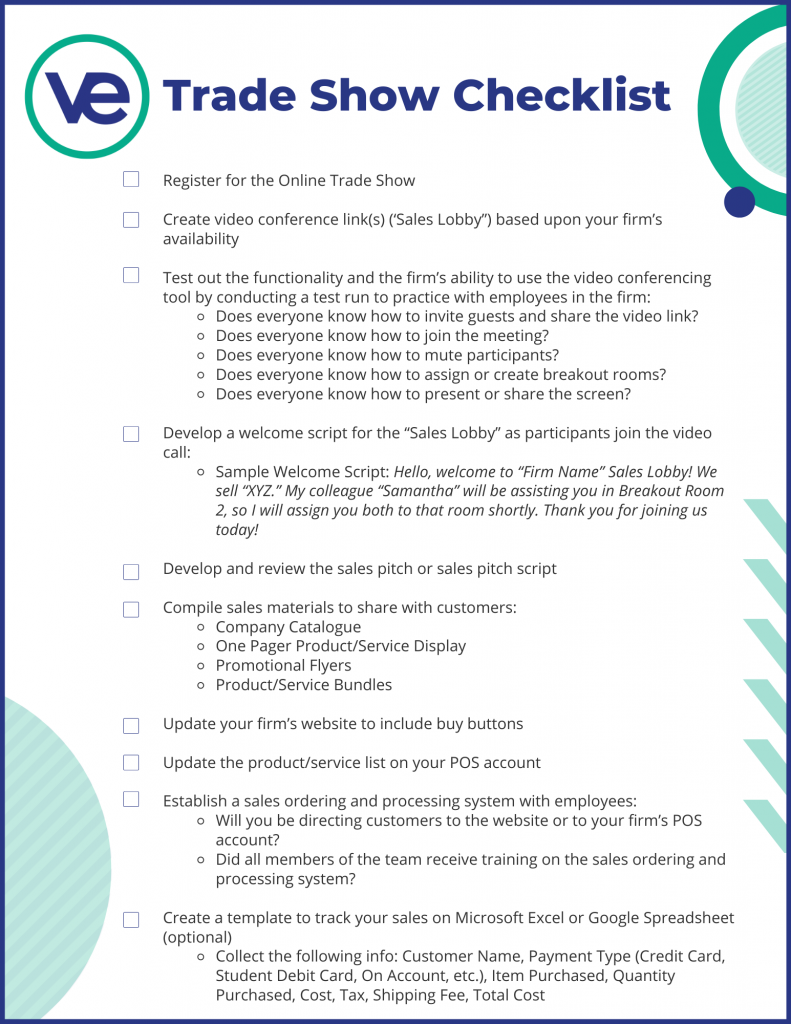
Complete this checklist to ensure you are well-prepared for upcoming Online Trade Shows.
Click the image to download the pdf.

Granting a student access to Online Trade Show Registration

Facilitators may grant a student permission to register their firm within the Online Trade Show interface. To do so, go to the Hub / Marketplace Tools / Firm Admin / Students, select the student and click Edit.

Click the checkbox next to “May register online trade show placements” to update firm roles for the selected student.

Conversation Examples & Sales Tips

Welcome & Greetings

  • Hello! Welcome to “Gotham Enterprises Sales Lobby.” My name is “Molly” and we are so happy to have you join us today. We are a company that provides office furniture and equipment catered to the needs of our customers.

Questions for Customers

  • What is your name?
  • Where are you joining us from today?
  • Is this your first time shopping during the International Online Trade Show?
  • We sell “XYZ.” What are your wants/needs as a customer? What would you like to see in the products/services we provide?

Setting up your “Sales Lobby”

As part of your placement registration, you will have to enter the meeting links based on your Sales Period availability. Firms will set up a video conference link to share as a “Sales Lobby” and include this link in the registration. Firms are able to select up to three sales periods for each trade show day.

Within the Sales Lobby, firms can choose to redirect shoppers to smaller conference calls with fewer people so that the firms’ sales representatives can conduct several trading sessions at once. These smaller conference calls are the “Breakout Rooms”. Additionally, firms will be able to manage participants, either granting or denying visitors access to their Sales Lobby and Breakout Rooms. See how to do so for each conference call tool below.

Using Zoom

  • Schedule a meeting to serve as the “sales lobby”
  • Enable breakout rooms
  • Review meeting controls and determine who will manage this

For more details on how to use this video conferencing tool, review the Instructional Guide for Using Zoom.

Tips when Using Zoom for the Sales Lobby & Breakout Rooms

  • Assign all Sales Rep from your firm as “Co-Hosts” for the video conference. This will ensure they have the ability to Admit Participants, Mute Participants, Present their Screen, and Record the Session.
  • When transferring a customer from the Sales Lobby to the Breakout Room, inform the customer to follow the steps below:
    1. Click on the link to join the Breakout Room.
    2. If they need to return to the Sales Lobby for any reason, they can click “Leave Breakout Room.”
  • If you need to remove a participant from the video conference, right click on their name, then select “Remove.”

Using Google Meet

  • Schedule a meeting through Google Calendar to serve as the “sales lobby”
  • Install the Breakout Room extension on Google Chrome linked here or create additional meetings to serve as Breakout Rooms
  • Review meeting controls and determine who will manage this

For more details on how to use this video conferencing tool, review the Google Support Center and Set Up Meet for Distance Learning for Educators.

Tips when Using Google Meet for the Sales Lobby & Breakout Rooms

  • Ensure that all team members are added as “Guests” to the Google Meet. This will allow them to have the ability to Admit Participants, Present their Screen, and Record the Session.
  • To remove a participant from the video conference, the Host should click the People icon (located on the top right), select the participant’s name and click the ⊝ icon to remove participant.

Using Microsoft Teams

  • Schedule a meeting through Calendar to serve as the “sales lobby”
  • Review meeting controls and determine who will manage this

For more details on how to use this video conferencing tool, review the Microsoft Teams Meeting Video Trainings.

Do you have any additional tips for the above video conferencing programs? Share them with us!

Recommendations for the Sales Lobby

  • The Sales Lobby should have two sales representatives (the teacher and one student) at all times.
  • The sales reps from the Sales Lobby should welcome and greet customers as they enter the video conference. To ensure customers remain engaged, sales reps can organize an ongoing sales presentation.
  • The recommended number of Breakout Rooms is one to three for each firm, depending on your comfort level and staffing availability.
  • There should be a separate group chat with the team to manage the flow of customers. For example, once Sales Rep 1 from Breakout Room 1 completes their sales pitch and the customer has left, they will message the group to inform everyone they are available for the next customer.
  • If you have to step away from the Sales Lobby, use any text to indicate you will “be right back in “X” minutes and present your screen to allow the message to appear when customers enter and you are not there.

NEW: Trade Show Tips

Overall Suggestions:

  • GREET YOUR GUESTS as soon as they arrive in your video conference room.
    Example: Hello! Welcome to “Gotham Enterprises Sales Lobby.” My name is “Molly” and we are so happy to have you join us today. We are a company that provides office furniture and equipment catered to the needs of our customers.
    Shoutout to VIBE who impressed guest shoppers with their welcome & thank you process!
    VE
  • DEVELOP & FOLLOW A PLAN for handling sales lobby traffic. Which salesperson is helping each customer? What will you do if multiple customers arrive at the same time? How will you manage engaging the customer, making the sales pitch, and then closing the sale?
    VE
  • ENGAGE YOUR CUSTOMERS by trying to learn something about them before you jump into your sales pitch. Explain how your products or services are a good fit for them and why. Sample Questions:
    What is your name?
    Where are you joining us from today?
    Is this your first time shopping during the International Online Trade Show?
    We sell “XYZ.” What are your wants/needs as a customer? What would you like to see in the products/services we provide?
    VE
  • KNOW YOUR PRODUCTS. This means ALL salespeople are well versed on ALL products and services, and that your sales team has a consistent sales pitch. Be ready to answer questions about what sets you apart from the competition and how you developed your product line and pricing strategies.
    VE
  • THANK YOUR CUSTOMERS at the end of the transaction, and remind them to provide feedback for your firm once they return to the trade show floor.

Technical Suggestions

  • Video Conferencing software often requires the person who sets up the meeting to OPEN the call or transfer ownership of the call before others can join. Be sure you understand the settings on your Zoom, Google Meet, MS Teams (etc.) account when using multiple hosts.
    VE
  • When setting up your Store Manager – customize your Shopping Cart and Checkout pages to enable customers to “continue shopping.” Go to Store Manager / Settings and enter both requested URL links.
    VE
  • Be mindful of the dollar amounts of your sales bundles. Guest shoppers have a $5,000 limit on their credit cards, but if a sales bundle is $5,000…the order will not process once tax or shipping is added.
    VE
  • Visual aids are very helpful during a sales presentation. If possible, have someone share their screen to show customers the products/services on your website or in your sales materials.
    Shoutout to Core, Inc. for their noteworthy effective use of screensharing!
    VE
  • Whether you are using breakout rooms or not, set up and employ a confidential manner in which to collect guest credit card information (via chat, etc.). In the real world, you would never read your credit card number aloud in a room full of people.

If you have questions during the event, you can use the “LiveChat” feature on the website to speak to a VE staff member who will assist you with your questions.

During the Trade Show

Accessing an Online Trade Show

To Enter a LIVE Online Trade Show

  1. Participants must first be logged into the Hub / Event Registration / Online Trade Shows / and have clicked a green Trade Show Floor button for a LIVE event.
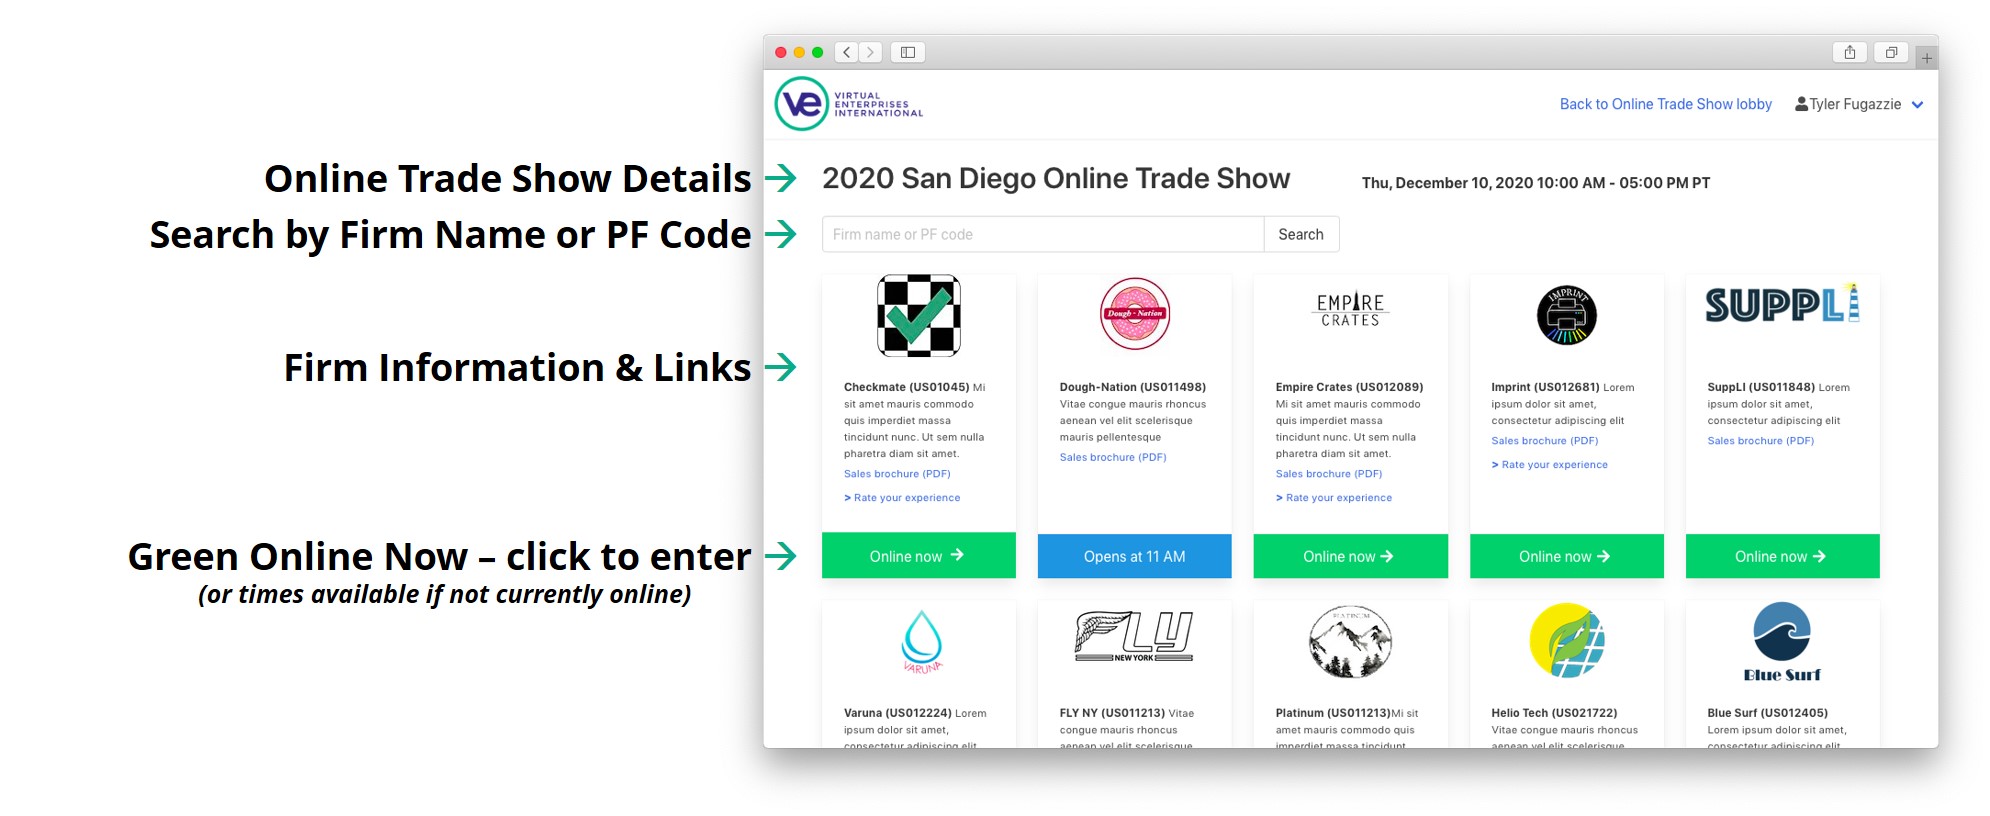
  2. Once on the Trade Show Floor, a shopper will see a listing of all registered firms participating in the show, including the firm name, description, links to their website and sales brochure (if applicable).
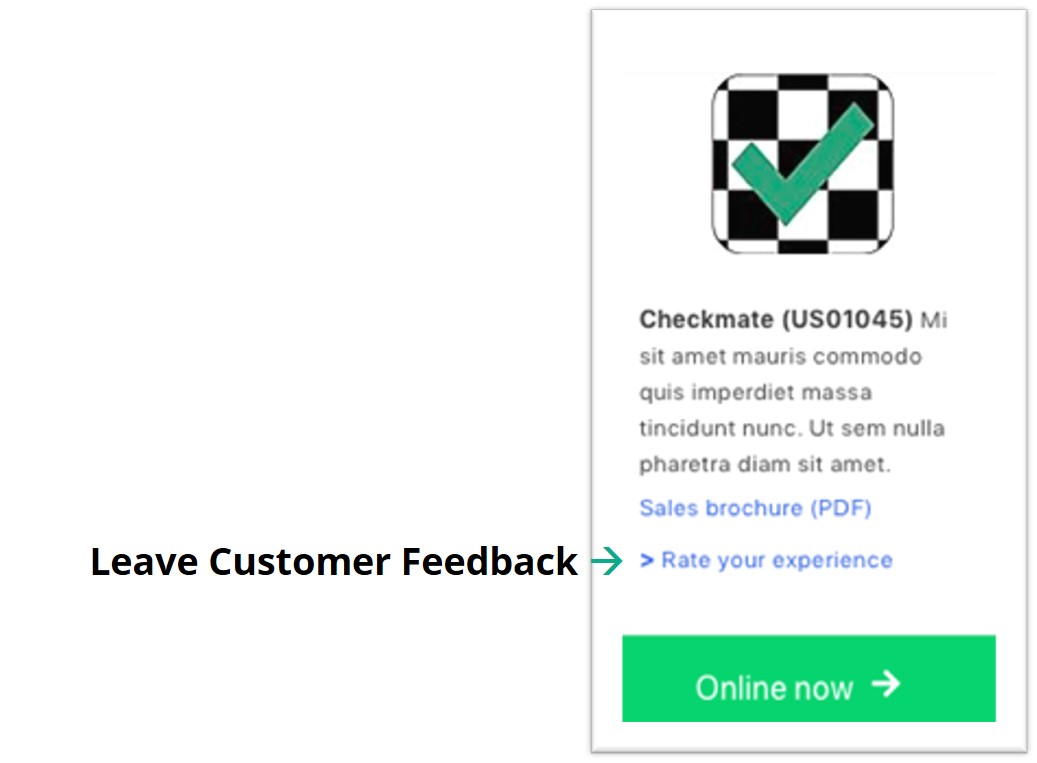
  3. At the base of the firm block, text will indicate Online Now, Opens at (time), or Closed.

Leaving Customer Feedback

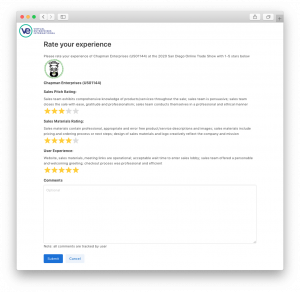
Shoppers will have the ability to rate their shopping experience following visits to other firm’s sales lobbies. The option to leave customer feedback will pop up automatically for qualifying shoppers, and will remain open for 72 hours following the end of an Online Trade Show. Please note: teachers and students are not allowed to rate their own firm’s online trade show placement.

An example of the feedback form:

Accessing Sales Lobby Attendance & Rating Reports

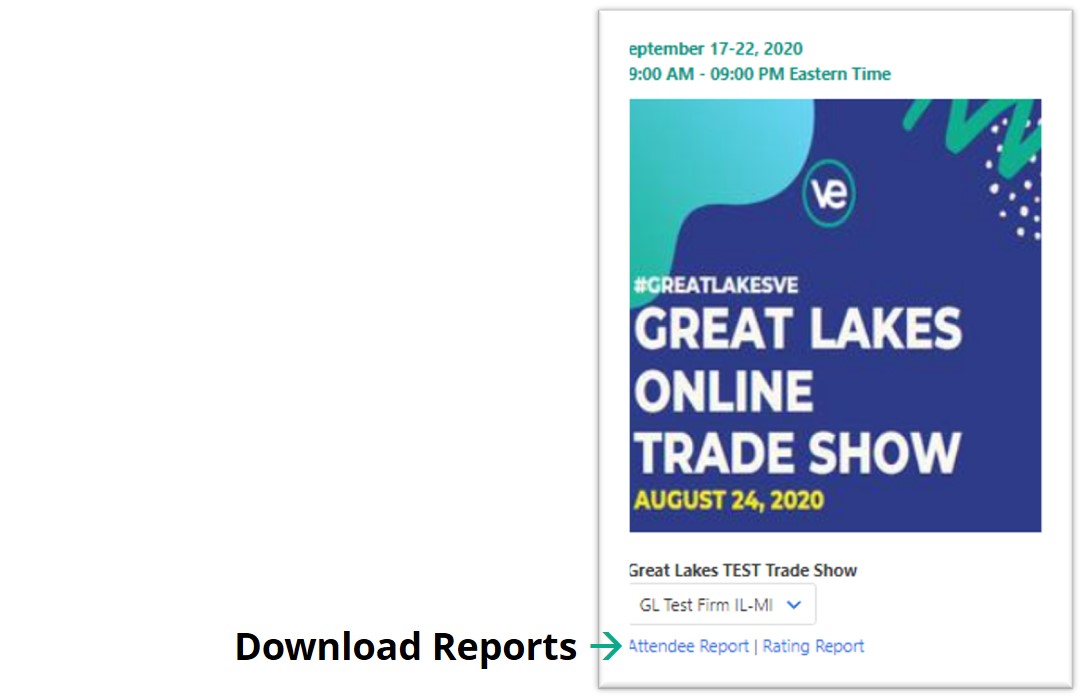
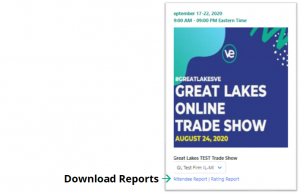
Once a show has ended, teachers can download an Attendee Report and a Rating Report (recapping all customer feedback) for each participating firm in an Online Trade Show. Look for the download links beneath the Trade Show registration icon, shown here:

VE-JV

Online Trade Shows provide VE students with a platform to promote their business, make sales, meet customers, and connect with other VE firms around the country. We are excited to invite our VE-JV student to participate in Online Trade Shows throughout the school year.

Year 1

VE-JV students in Year 1 will access VE Online Trade Shows by going to the Hub / Event Registration / Online Trade Shows. From the Online Trade Shows landing page, VE-JV students in Year 1 will see options and instructions for obtaining and using a VE Credit Card with a maximum spending limit of $5,000.00 per transaction. VE Credit Cards can be used during Online Trade Shows to make purchases from other VE student firms.

Year 2

VE-JV students in Year 2 will access VE Online Trade Shows by going to the Hub / Event Registration / Online Trade Shows. For Year 2 students, teachers have the option in Firm Admin to choose between providing students with a VE credit card (reference the Year 1 process above) OR linking the students’ trade show login with their VE bank account. This choice will allow Year 2 students to participate in and make purchases during an Online Trade Show prior to having their VE bank accounts set up.

Video Conference Etiquette

Prior to joining the online trade show:

Be Prepared. Allow yourself time before each session to ensure your internet is properly functioning. Wear business casual attire and frame the camera correctly.

Waiting Rooms. If you join a meeting prior to the start time, you may be sent to the waiting room where you will stay until the host lets you in. The host may choose to let you in instantly or it may take a few minutes if they are engaging with other customers.

During the trading session:

Mute. Your microphones may or may not be muted upon entry of each session. If you are not speaking, try to remain muted to ensure you do not interrupt a sales transaction.

Chat. Use the chat function to ask questions and to introduce yourself. If there are several customers in the Sales Lobby, the sales representative may choose to share the firm website into the chat for customers to browse through as they wait.

Stay Organized. We suggest you minimize the amount of tabs you use in your web browser to easily navigate between the Online Trade Show and any other platforms.

Breakout Rooms. Some firms will set up breakout rooms for trading. Be prepared to engage in trading when you are sent to a breakout room.

After the trading session:

Follow Up. You can share your firm’s contact email or request contact information to connect with one another after the trading session.

Feedback. Complete the customer experience survey after you have ended a trading session and provide feedback on what worked and what could have been improved.

If you need to report a user, complete the “Report a User” form linked here.

Selling and Processing Sales (Trade Show POS)

You will be selling to two categories of customers:

  1. Customers who are visitors to the trade exhibition (non-VE participants) and do not have online virtual checking accounts. These customers will pay for their purchases using the US Network Bank Card that will be provided to them on the day of the trade exhibition. Each card can only be used at one booth at a time and has a randomized dollar amount that is visible on the card.
  2. Customers who are VE participants (VE firms and VE students) who have online virtual checking accounts. These customers will pay for their purchases using the new Student Debit Card. VE Firms will most likely make their purchases “On Account”, which means they will make payment for the sale at a later date.

You may choose to process your sales through the Trade Exhibition Point of Sale System (POS). The POS system is provided to VE firms with an exhibition booth to easily process trade exhibition sales payments. This system can be used on a smartphone, iPad/tablet, or laptop with a WiFi or cellular data connection.

The Point of Sale System User Guide can be found in the Hub / Marketplace Tools / Trade Show POS / User Guide tab

Instructions for setting up and using the Student Debit Card can be found in the Hub / Curriculum / Department Tasks & Resources / Operations / Task 5 Organize Trade Show Activities / OPS 5 Reference – Student Debit Card for Trade Show Exhibition.pdf

Instructions for using the US Network Bank Card can be found in the Hub / Curriculum / Department Tasks & Resources / Operations / Task 5 Organize Trade Show Activities

Refer to the Trade Show POS document linked here for more details.

Helpful Information

Online Trade Show FAQs

Online Trade Show Floor (Access Questions)

Q: Do teachers/students need a password to access the Online Trade Show Floor?
A: Students, teachers and guests will be entering Online Trade Shows through the Hub / Event Registration / Online Trade Shows. Students/teachers will use those credentials to access the Online Trade Show Floor. There is no additional password.

Q: Do we need to complete the Participation Agreement?
A: Yes, all participants will be asked to submit the agreement to access the Online Trade Show.

Online Trade Show Floor (Slots & Shifts Questions)

Q: Can students buy during a different time slot as they will be selling during our designated time?
A: Yes! We suggest that students purchase from other firms during the times they are not selling.

Q: What if my firm is only able to participate in part of a Trade Show time slot?
A: When you register for an Online Trade Show, you will indicate time slots during which your firm will be open for business. If your firm will be open for business during the entire trade show time, you would just enter one sales period matching the show times. However, each firm can choose up to three sales periods during a show (example: 9a-11a, 12p-1p, and 2p-3p) in the event you are only able to participate during a portion of the day.

Selling to Customers

Q: Can students share their screens if they have trade show marketing pieces to show?
A: Absolutely! We encourage them to share any pertinent marketing information they have created for the event and use a PowerPoint to share it with the customers.

Q: When making a sales transaction, do students need to have the camera on?
A: No, you may want to turn the camera off if you do not want your student names and faces to show up on video.

Q: What recommendations are available for firms that need to “close” for a brief period during a show? Can you direct customers to the firm’s website?
A: Based on your firm’s registration time slots, your firm will appear as “Online Now” when you are open for business, “Closed” when you are not, or “Open at” for an upcoming sales period. If your sales team is taking a short break during a registered sales period, we suggest posting a message on the Sales Lobby screen to indicate you are closed. This can be done by creating a PowerPoint or Google Slide presentation with a message “Be Back Soon” or something similar, then sharing your screen. All firm websites are linked in each firm’s icon on the Trade Show floor.

Bank Account / Credit Cards Questions

Q: Do teachers receive credit cards or are they using their bank account?
A: Teachers can use the teacher bank account. If you do not have enough money, you can contact your regional director for additional funds.

Q: Do students receive credit cards or are they using their bank account?
A: Students should be using their own bank account. When an Online Trade Show is LIVE, students will have the ability to access their student debit card and authorization codes on the same page.

Q: How do guests receive a credit card?
A: Guest credit cards will be available upon logging into the shopper account and downloading the credit card from the page.

Point of Sale

Q: Do students have access to POS or is it just the teacher?
A: The teacher has access to the POS, and will have to grant access for students for the POS (Marketplace Tools / Firm Admin / Select Student Names / Check off Access to POS).

Q: Common issues with POS and good reminders:

  • Students forget their authorization codes – remind students they need their Debit Card numbers AND authorization codes to shop using any POS System.
  • Authorization codes “not working” – often students try to use their codes out of order; they need to ensure codes are used in sequence
  • How to update sales tax
    • For the POS account, select “Settings” and “General”, then edit the rate
    • For the buy button, select “Store Manager” and “Sales Tax Rate,” then edit by state / country
  • Reminder: no POS needed if selling directly through website

Sales Lobby

Q: Can we as teachers be in our sales lobby?
A: Yes, we suggest that teachers are in the sales lobby at all times.

Q: Can there be more than one student selling in a sales lobby?
A: Yes, but the students will need to take turns because otherwise they will be talking over each other.

Q: Since the website is listed on the Online Trade Show Floor, would students have to go into the Sales Lobby?
A: If students would like to speak to a live sales representative from a firm to trade with them, then they should enter the Sales Lobby. They could purchase from the firm through the listed website as well.

Google Meets

Q: Does the process work the same way with Google Meet as it does with Zoom?
A: It’s slightly different for Google Hangouts Meet. The host would be considered the “Organizer” and the co-hosts would be the “Guests” from the Google Hangout Meets. The breakout rooms would be additional video conferencing links that are shared in the Sales Lobby.

Zoom

Q: Who is the host? Is it the students or the teacher?
A: The host is the individual that created the video conference link. The host can assign co-hosts in a meeting, which will allow the other users to have the same capabilities as the host.

Q: Do we need the paid version in order to assign co-hosts?
The co-host feature is available for all Zoom versions. However, this feature must be enabled in the account settings. To enable the co-host feature, follow the instructions from this link.

Q: Do we need the paid version to set up breakout rooms?
A: The Breakout Room is available for all Zoom versions. However, this feature must be enabled in the account settings. To enable the Breakout Room feature, follow the instructions from this link.

After the Show

Approving Student Comments

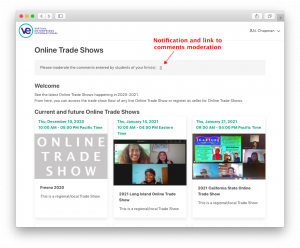
After a trade show ends, teachers can view and approve comments entered by the students in your firm. The comments are automatically sent to firms if they are not approved within 3 days.

Download Attendee and Rating Report

Once a show has ended, teachers can download an Attendee Report and a Rating Report (recapping all customer feedback) for each participating firm in an Online Trade Show. Look for the download links beneath the Trade Show registration icon, shown here: