Portal User Manuals
FAQs
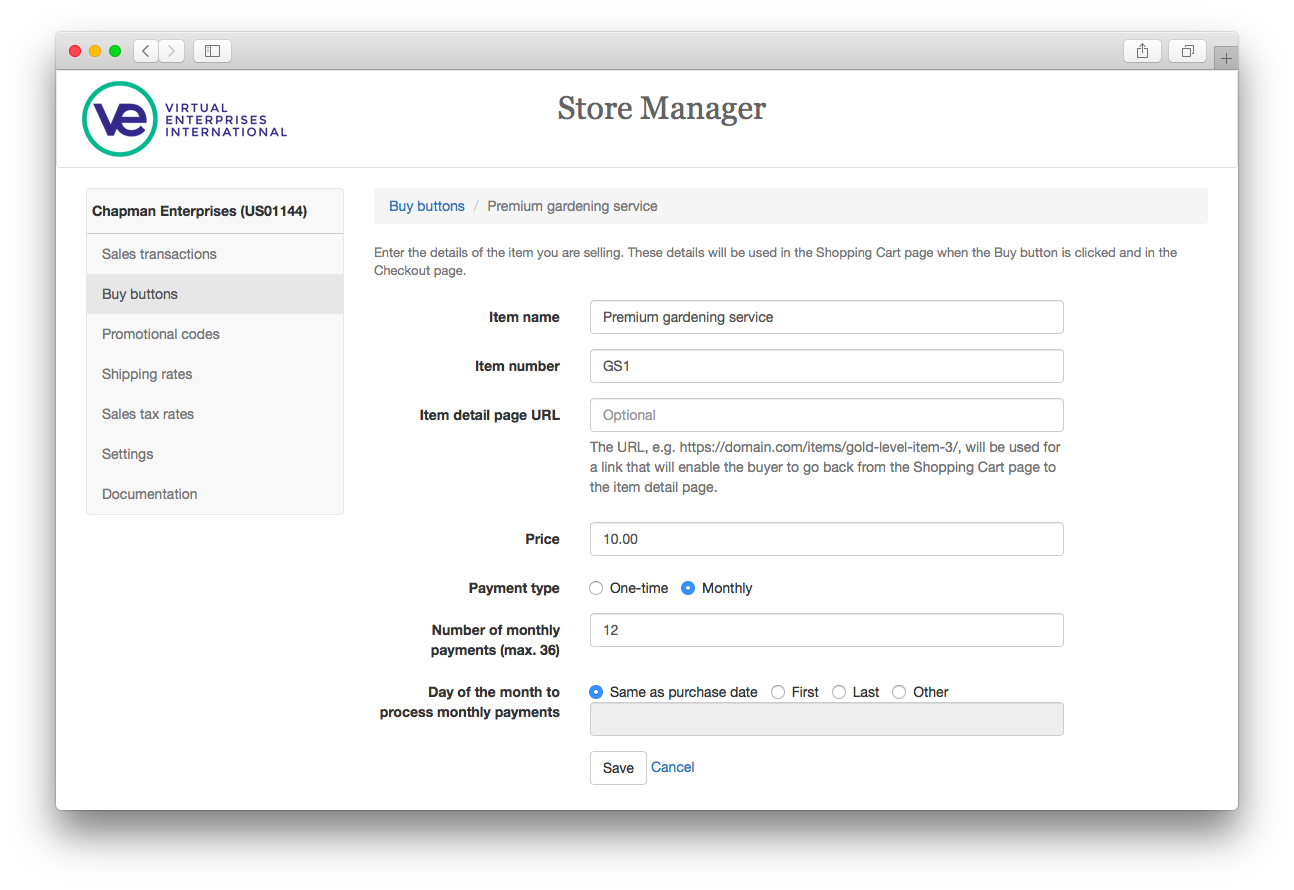
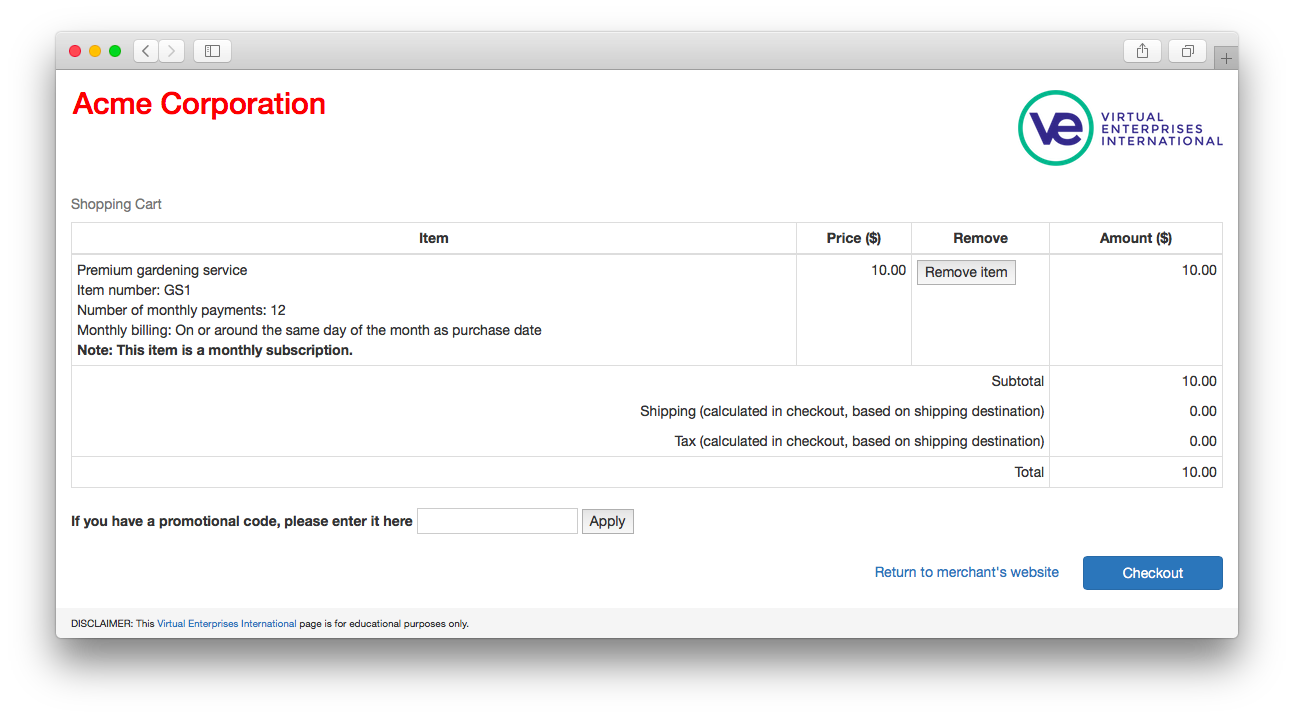
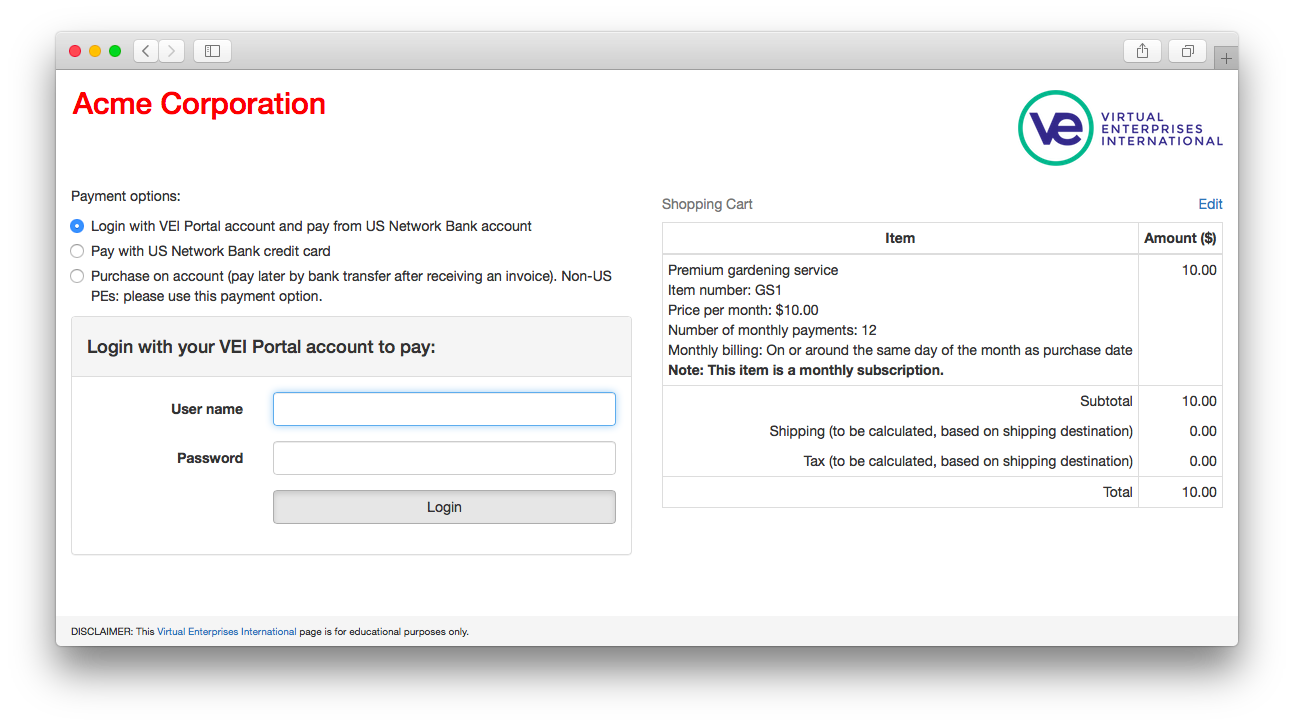
How to Set Monthly Billing in Store Manager
- Login to the Portal
- Go to the Store Manager
- Go to the Buy Button section found on the sidebar
- Within the item details, you will see an option withing “Payment type” to select Monthly
See screenshots below to see the setup on the Store Manager and how the monthly payments looks on the checkout screens. Click the images to enlarge.
How to Make Company Logo Visible in Firm Directory
- Login to the Portal
- Go to the Store Manager
- Go to the Settings section found on the sidebar
- At the top of Settings, you will see a spot to upload your firm’s logo
- Your logo is now visible in the Firm Directory
See screenshots below to see the setup on the Store Manager and how the logos look in the Firm Directory. Click the images to enlarge.
Teachers - Make the Store Manager Visible for Students
The Store Manager is a tool that allows firms to sell products and services directly on their website. In order to begin using the Store Manager, teachers must set which student(s) can access the Store Manager, similar to setting access for bank accounts and the Wholesale Marketplace.
Follow these steps to make the Store Manager visible for students:
- Sign into the Portal with your teacher username.
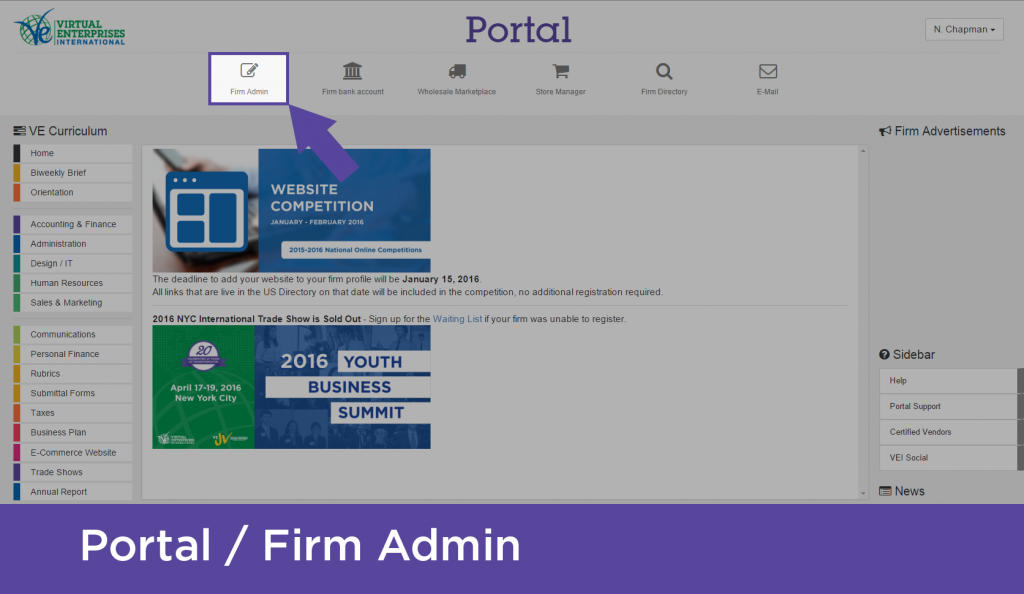
- Click on Firm Admin in the top toolbar (pictured below), and choose the students’ firm.
3. You will instantly see the Students management tab after clicking into Firm Admin. This is a list of students, their information, and account management controls. Click on the name of the student(s) who you want to give access to the Store Manager.
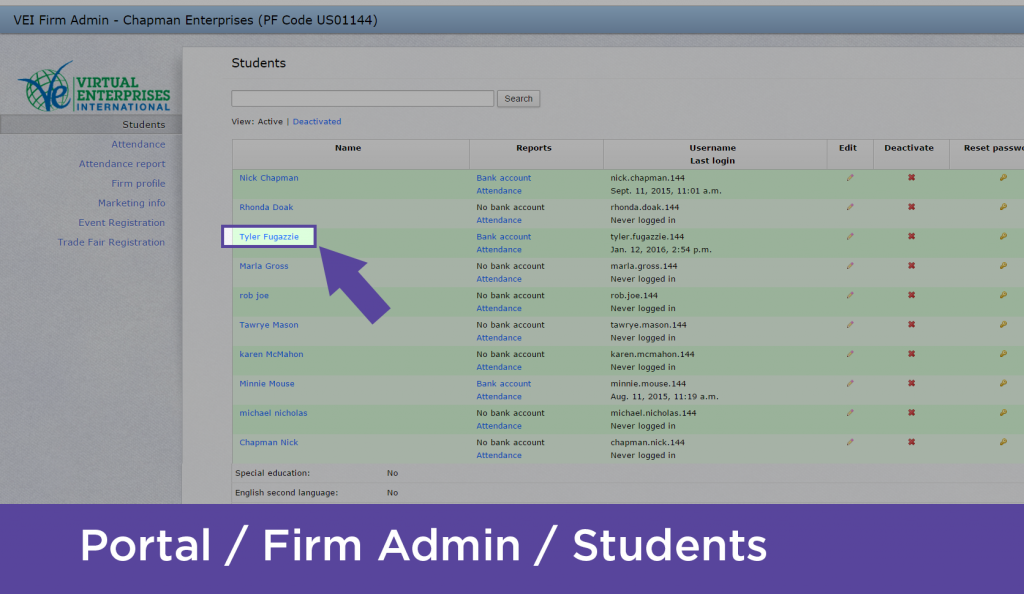
4. If the Access to Store Manager field is set to “No,” click Edit at the bottom of the student’s profile.
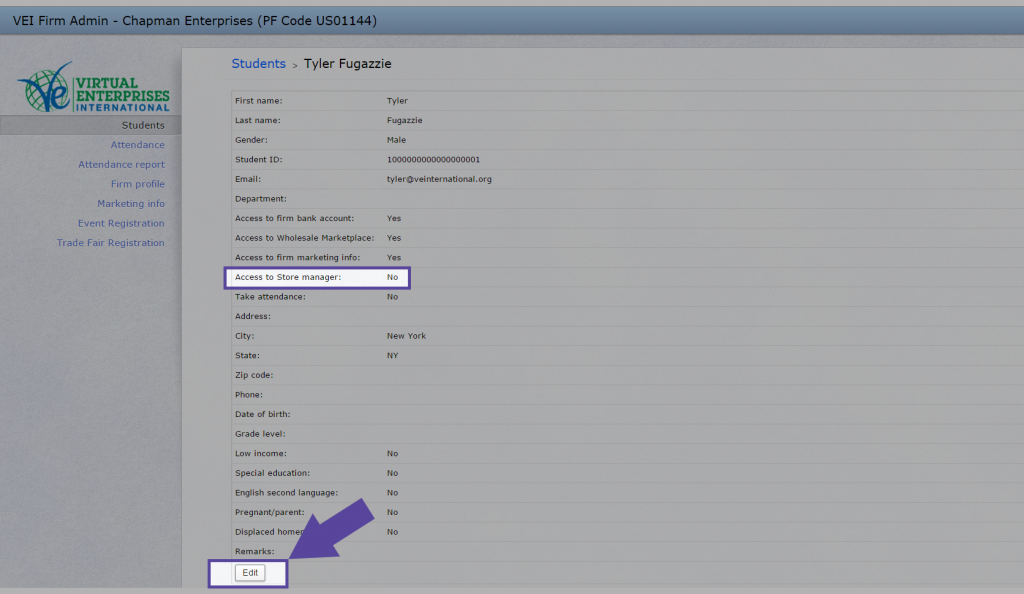
5. Check the radio box to grant Access to Store Manager.

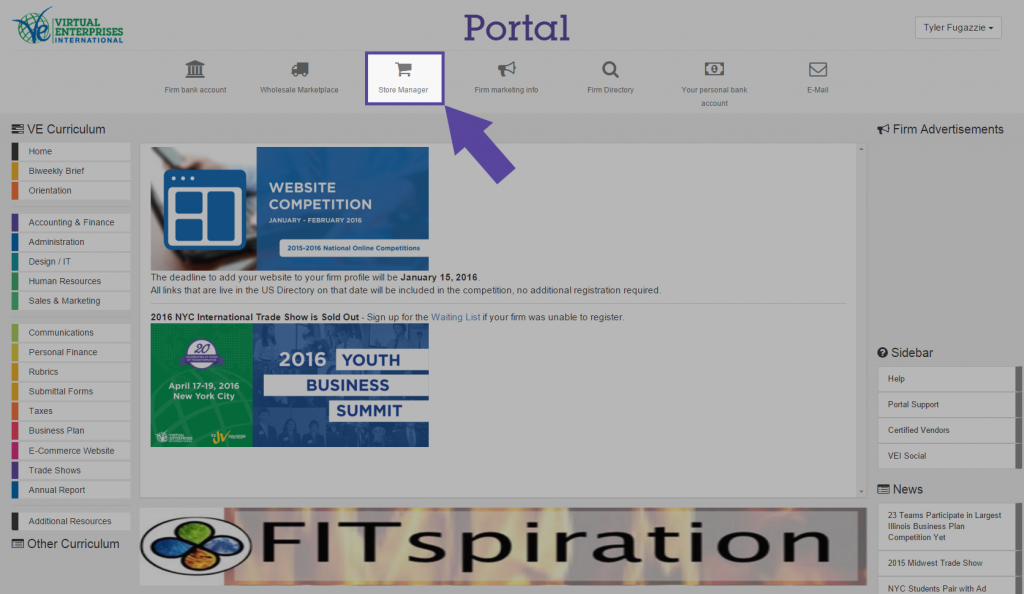
6. The next time this student logs in, they will now see the Store Manager at the top of the Portal.
Access Firm Email (in Portal)
Follow these steps to sign into your firm’s official email account:
- Sign into the Portal.
- Click on the Email button in the top toolbar (pictured below).
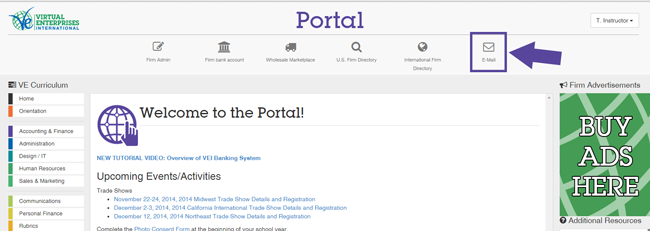
3. A new tab will open for Gmail, the email provider VEI uses for firm emails. If you use Gmail for another email account, such as a personal email, then you may be taken to that email inbox. Sign out of this other Gmail account to get to the Gmail login screen (pictured below). You may need to click on the Sign in with a different account button.

4. Sign into your VEI firm email
Online Business to Business Purchasing
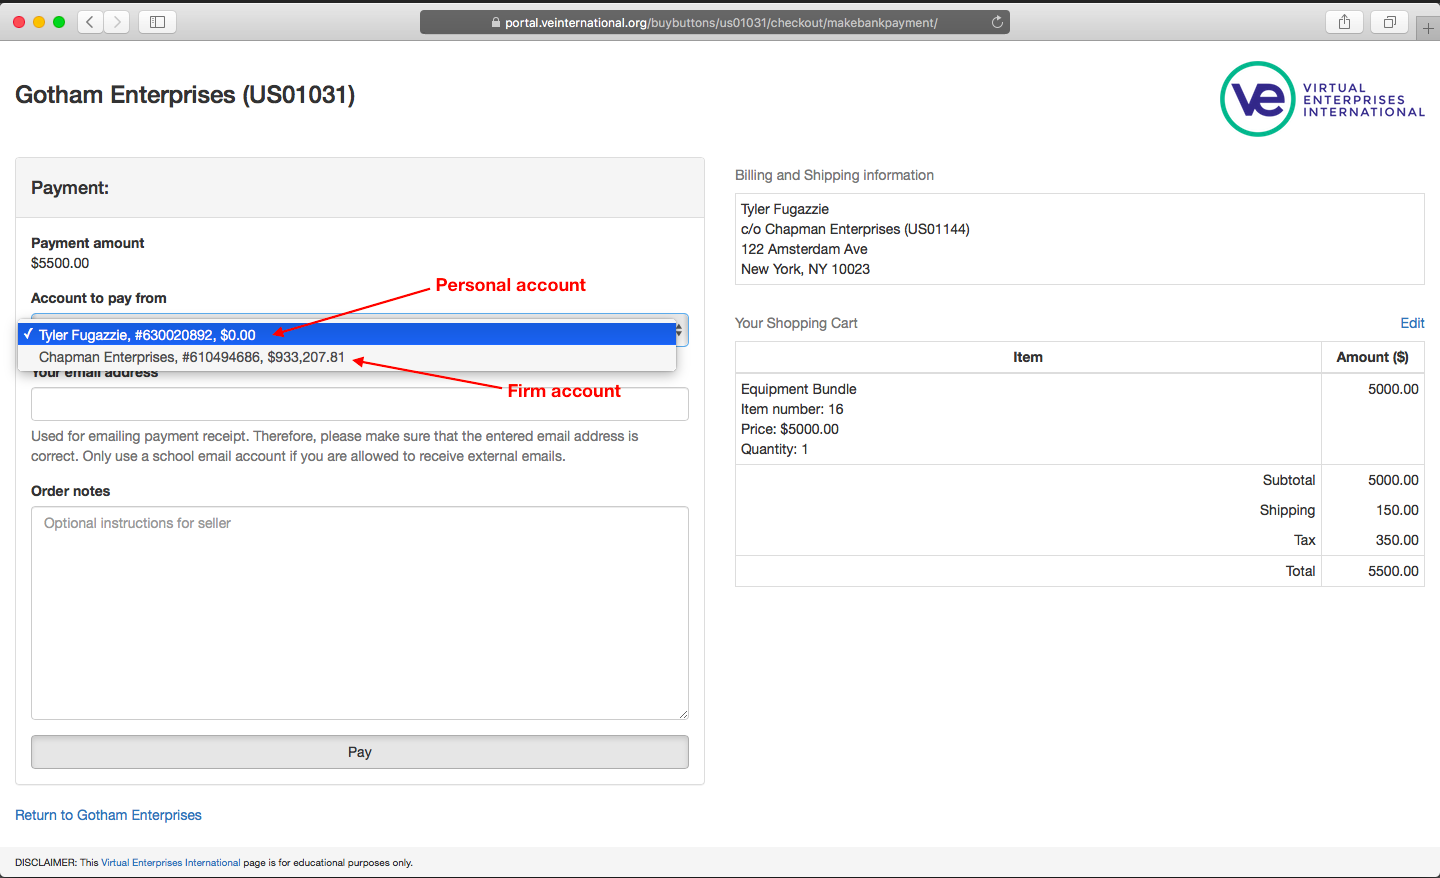
New business accounts can now make purchases through online Buy Buttons.
- Only students can use their user account to login to pay. At this time, teacher user accounts cannot be used.
- If a student has been assigned access to the firm bank account then the drop down list of bank accounts will consist of the student’s personal bank account and the firm bank account. Otherwise the drop down list of bank accounts will consist solely of the student’s personal bank account.
- By using the firm bank account for payment of Buy Button order, the student is doing a Business to Business purchase. If a student uses his/her personal bank account for the payment, then it is of course a Business to Consumer purchase.Below is a screen shot of the Buy Button checkout page with Tyler’s student account. Because Tyler is assigned access to the firm bank account, Tyler can either use his personal bank account or the firm bank account.
Find Firm Emails
Follow these steps to find email addresses for firms in VEI’s U.S. Network:
- Sign into the Portal.
- Access the U.S. Firm Directory from the top toolbar (pictured below).

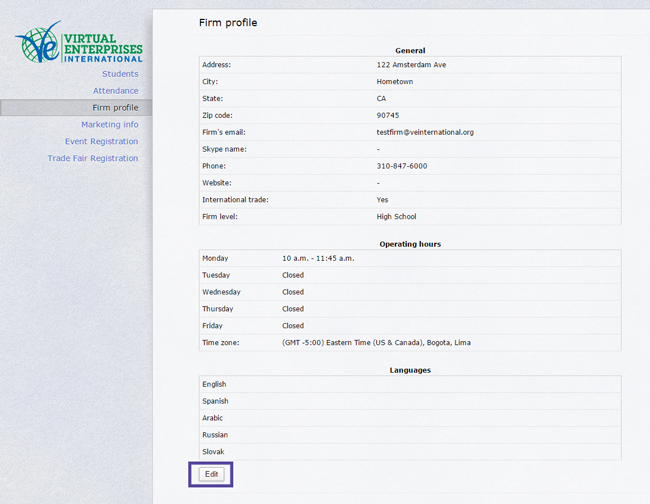
Editing a Firm’s Address, City, State, and/or Zip Code
To update your firm’s address information in the Portal, follow these steps:
- Login to the Portal.
- Click on Firm Admin on the top toolbar.
- Select Firm profile on the left sidebar.
- On the Firm profile screen, click the Edit button at the bottom of the page.
5. Update the information in the address, city, state, and zip code sections.
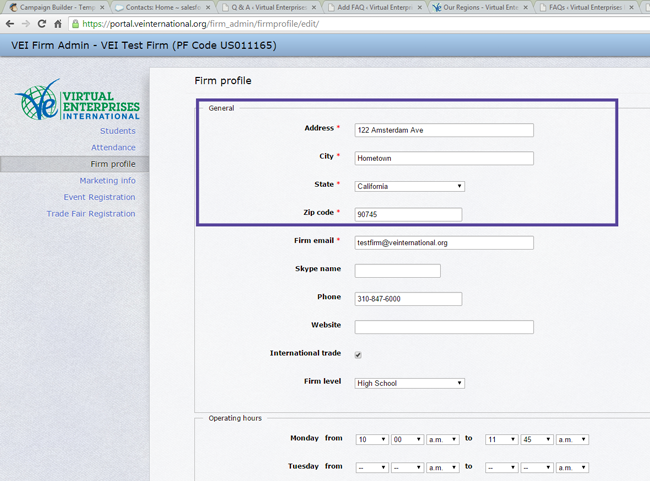
6. Scroll down and click Save or cancel if you don’t wish to keep these changes.
Update Firm Marketing Information in Portal
To update your firm’s Marketing information in the Portal, including business categories, company languages, key terms, and social media account addresses, follow these steps:
- Login to the Portal.
- Click on Firm Admin on the top toolbar.
- Select Marketing info on the left sidebar.
- On the Marketing info screen, click the Edit button at the bottom of the page.
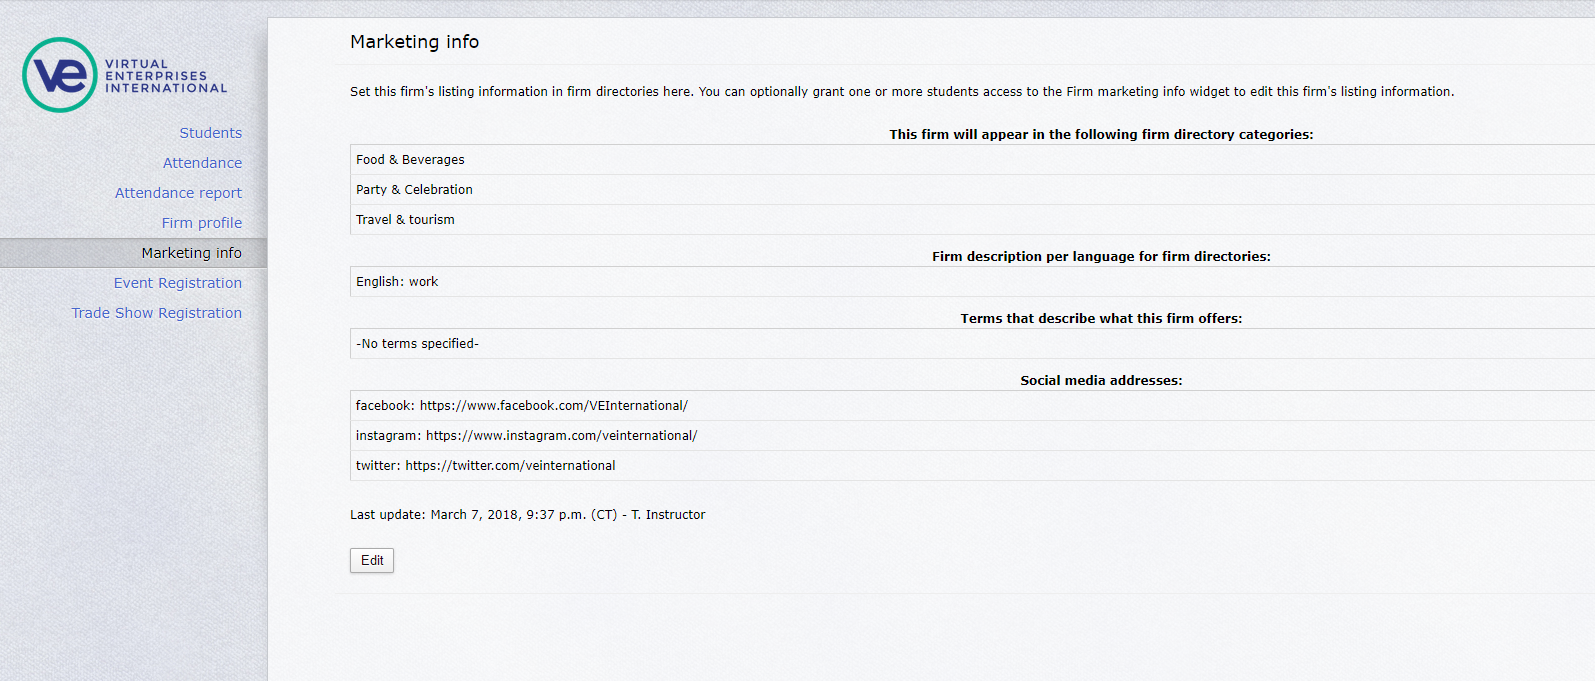 5. Update the relevant information.
Add a Firm Website
To add your firm’s website to the U.S. Firm Directory, follow these steps:
- Login to the Portal.
- Click on Firm Admin on the top toolbar.
- Select Firm profile on the left sidebar.
- On the Firm profile screen, click the Edit button at the bottom of the page.
 5. Type or copy and paste your website into the box next to Website.
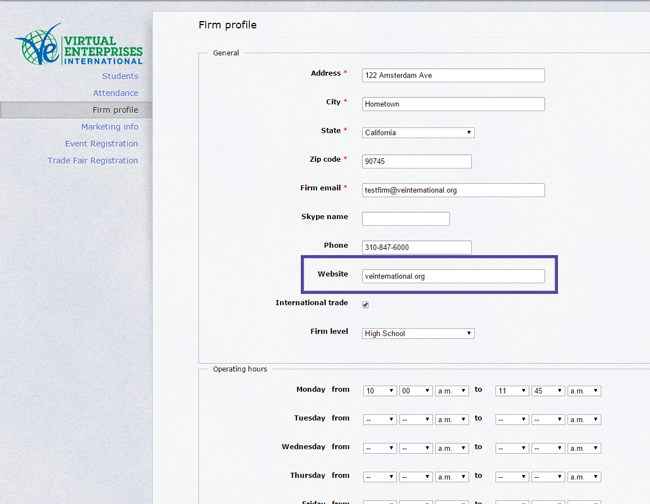 6. Scroll down and click Save or cancel if you don’t wish to keep these changes. After saving, your firm’s URL will appear in your Firm Profile.
 7. After adding your firm’s website, your firm name will become a hyperlink in the U.S. Firm Directory in the Portal and the national website leading to your firm’s website.
Find the National (U.S.) Firm Directory
The U.S. Firm Directory allows for VEI firms to find and contact one another. The directory can be found in two ways.
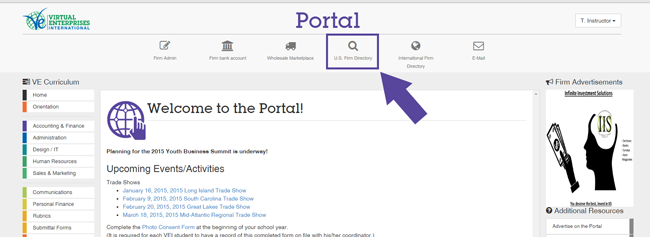
- From the Portal, click on U.S. Firm Directory on the top toolbar.
- From the national website, go to the Explore menu tab and click on U.S. Network Firms & Schools Directory or follow this hyperlink – https://veinternational.org/us-firm-directory/
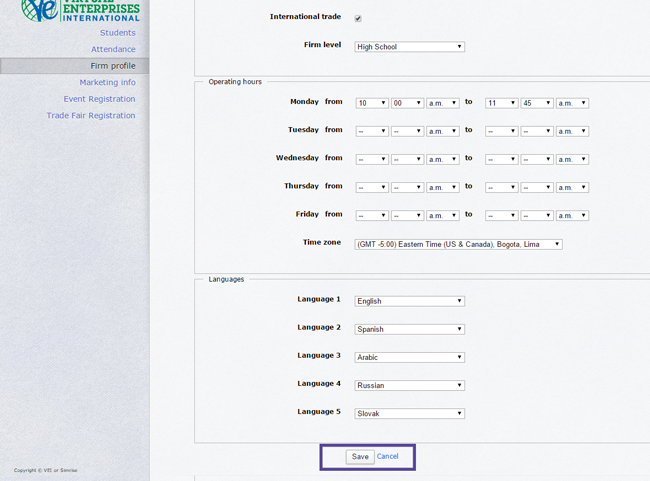
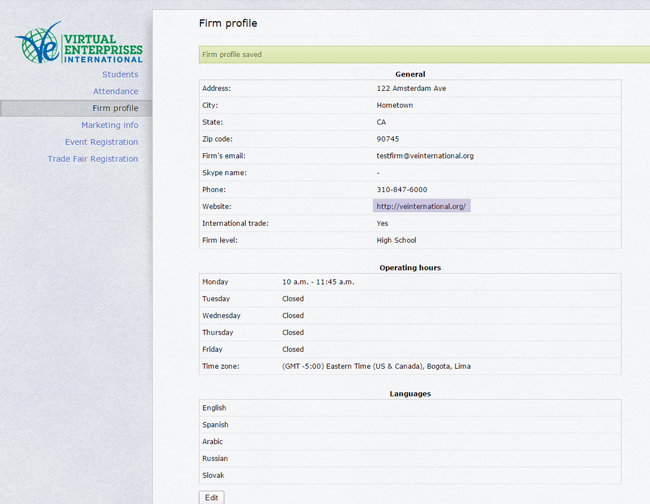
Viewing International Firms (for Payments and Invoicing)
If you or your firm is trying to conduct business with an International Firm, but you’re unable to see them in the Portal to send an invoice, please follow these steps:
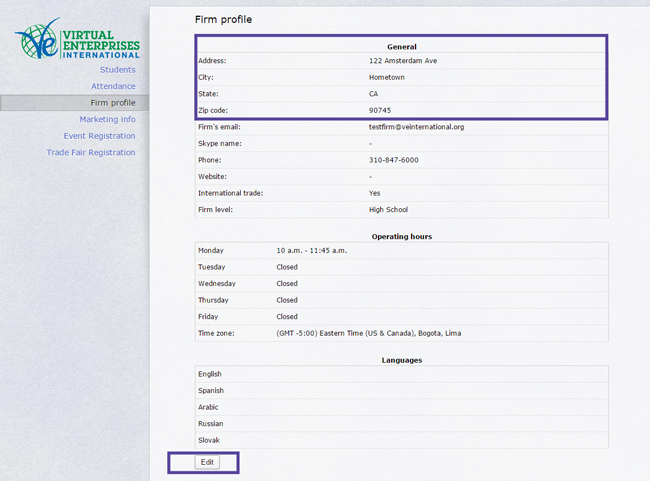
- Go to Firm Admin on the top toolbar
- Click on Firm Profile on the left sidebar within this Firm Admin page (see image below)
- Check the General section and see if International Trade is checked as “Yes”
- If not, click on Edit at the bottom of the page and then check this box
- Check the Operating Hours and make sure your firms’ operating hours are selected for each day (see image below)
- If not, click on Edit at the bottom of the page and select your hours
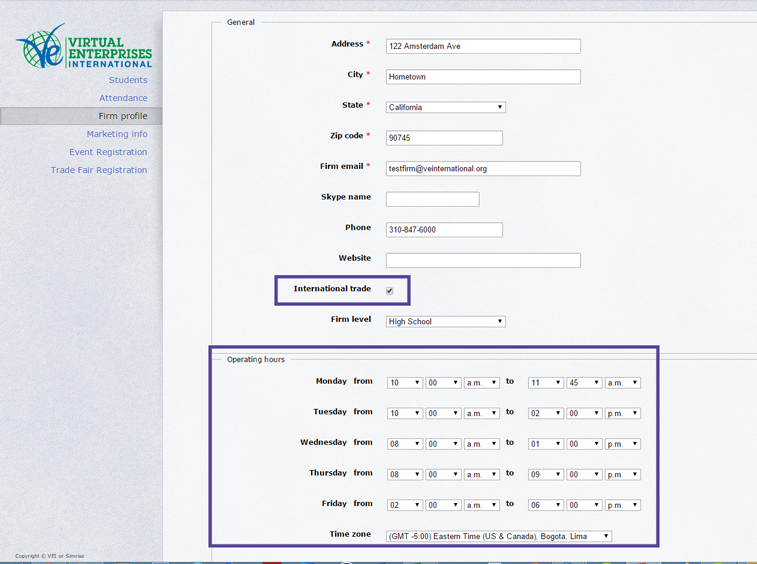
Once these conditions are met, your firm will be able to see International Firms in order to send them invoices and make payments. If you follow the directions above and still don’t see the International Firm, then we suggest emailing that firm and alerting them to fill out the necessary firm profile information on their end.
Teachers - Reactivate a Student
If you believe you’ve accidentally “deleted” a student from the Portal, there is nothing to fear. By default, students can only be “deactivated,” meaning they will only be inactive and temporarily unable to use the Portal, but they can be easily “reactivated” at any time.
Follow these steps in order to Reactivate a student:
- Sign into the Portal with your teacher username.
- Click on Firm Admin in the top toolbar (pictured below), and choose the students’ firm.

3. You will instantly see the Students management tab after clicking into Firm Admin. This is a list of students, their information, and account management controls. If you have already deactivated the student, they will not appear in this list.

4. Click on the “Deactivated” view to see a list of deactivated students.
5. Look at the rightmost column to find a button to “Reactivate” the student. Click on the button.

6. The student will now be active again. Click on the “Active” student view and confirm that the student appears in this view. This student can now login to the Portal again.

Pay an International Firm from a Student Account
Students are currently unable to pay international firms directly from their student accounts. Only firm accounts can make payment transfers to international firms. Students must transfer payment amount from their student account to the firm account to complete the transaction.
Get a VEI Email
Contact your Regional Director about setting up an official VEI email for your firm.
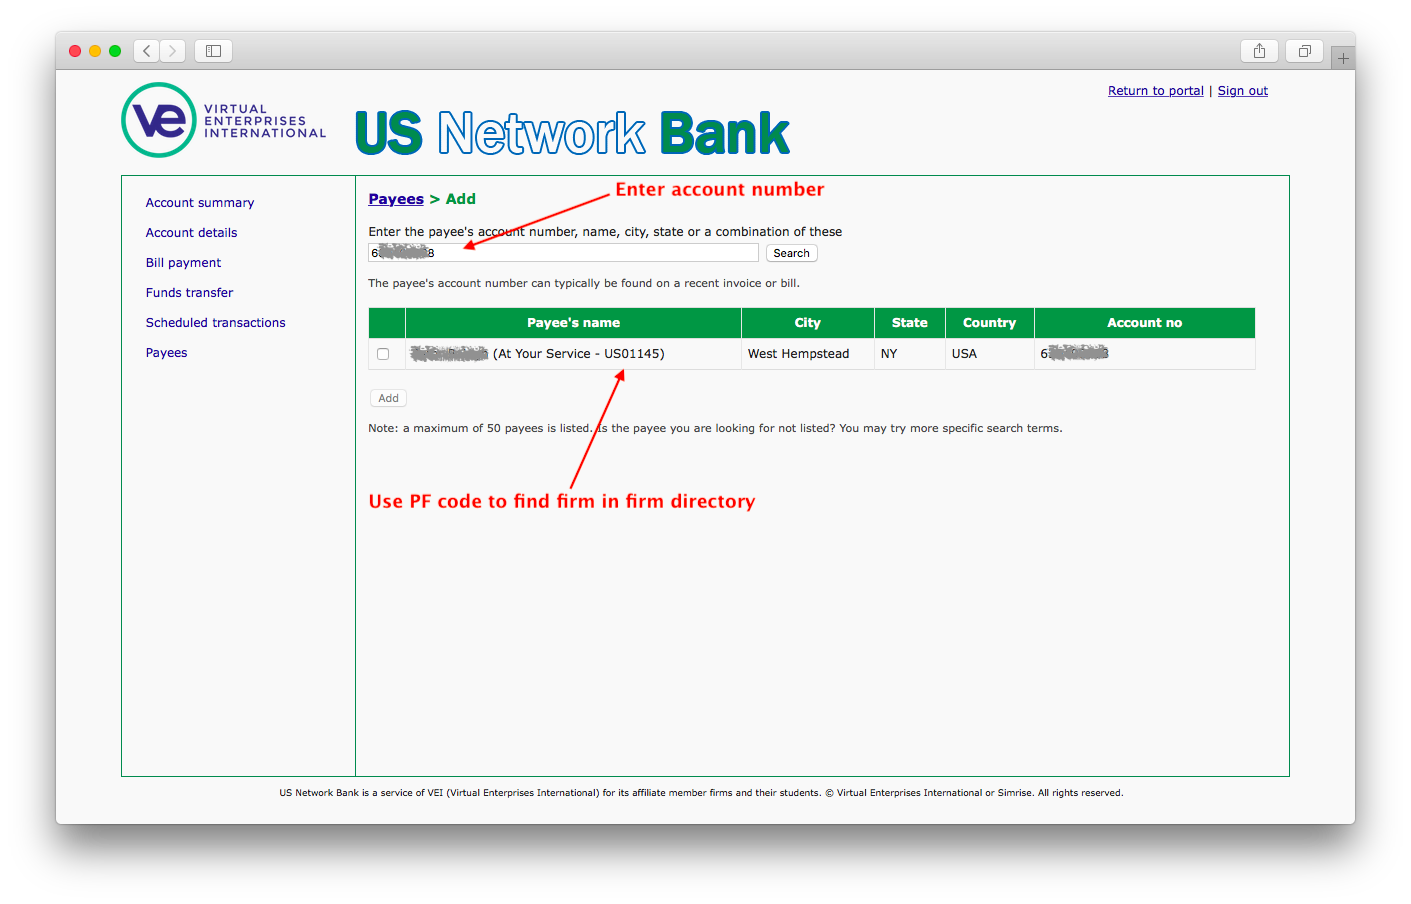
How to Use a Bank Account Number to Find Contact Information
- Login to the Portal
- Access the US Network Bank account on the top toolbar
- Click on Payees
- Click Add payee
- Enter the bank account number you have to find the firm information (see image below)
- Click on Return to portal in the top right corner of the US Network Bank
- Click on Firm Directory on the top toolbar
- Search for the firm to find their available contact information
How to Transfer Existing Employees to a New Company
Since the Portal does not allow two students with the same ID number from the same school, you must “transfer” employees.
- Activate the student from the deactivated list.
- Edit the student to add a character to the end of their student ID number, example: 9298723X.
- Enter the student as a new student in the appropriate firm.
How to Process Trade Show Payments After the Show
When processing Trade Show payments, you have two options that may be helpful:
(1) Use the information collected at the Trade Show to prepare individual invoices to send to each VE student customer. Once the invoice has been delivered, the student will then need to log into their bank account to make a payment to your firm. The firm requesting the payments will need to be diligent in following up to collect on these sales.
(2) Send each customer a link to their website to complete their purchase using the Store Manager checkout function. (This may lead students to purchase other products than originally ordered from the website versus the trade show). Again, the firm requesting payment must follow-up to ensure the customers complete the transactions.
Email Tyler Fugazzie at tyler@veinternational.org if you don’t see the answer to your question.